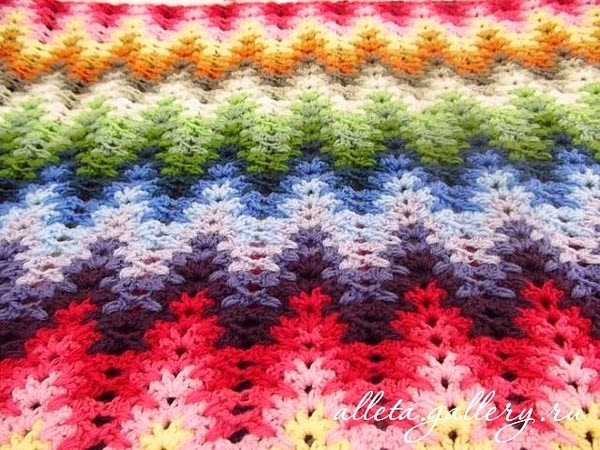
Афганское вязание МК. Step by step
Получаются очень красивые пледы.
5. Skip 2 chains. Make a cluster, 3 chains and
another cluster all into the next chain.
10. Now make 5 chains and turn your work and make a cluster into the 3-chain space.
Since some of you are having doubts about ending and starting a row I have included these
additional instructions and photos to elaborate on them.
In the above picture you can see that I have
made 5 turning chains and made 3 dc (cluster)
into the space between the two clusters in the
previous row.
11. Into the next space make another dc cluster.
12. Into the next space one more cluster.
15. At the end of the 2nd row make a cluster, 3 ch, cluster into the 5-ch turning space. (Remember I
told you earlier make pattern such that you end with a peak).
http://thelazyhobbyhopper.blogspot.ru/2011/08/how-to-crochet-granny-ripple.html
А вот МК на английском есть.
.
How to crochet granny ripple
I am sure many of you who can crochet fairly well may not know how to crochet a
granny ripple. While I was crocheting my vibrant pillow 3 I thought I would make a tutorial
on granny ripple but for some reason I couldn't do it then. Here it is now.
Once you get started and go in the right direction granny ripples are fun to make, but getting
started is what irks me a lot. The major problem here is deciding upon the number of chains
to start with. Since you are not going to work in a straight pattern the length of the chains that
you make at the beginning have to be somewhere around one and half times the length of the
finished pattern. (I am saying this from my experience, but it may not be correct). So the safest
bet is to make extra chains, you can always sew in the extra length of the chains instead of having
to pull everything apart in case your work becomes shorter.
So to start with, make chains of length that you desire. Then in the 6th chain from the hook make
3 dc (cluster).
3 dc (cluster).
1. Skip 2 chains, in the next chain make another cluster (3 dc).
2. Skip 2 chains, in the next chain make one
more cluster.
more cluster.
3. Skip 5 chains and make a cluster in the next chain.
4. Skip 2 chains, make a cluster in the next
chain.
chain.
another cluster all into the next chain.
6. Skip 2 chains, make a cluster into the next
chain.
chain.
7. Skip 2 chains, make a cluster into next chain.
8. Skip 5 chains, make a cluster into the next
chain.
chain.
9. You have to repeat this pattern through the length of the chains. You can see the peak and the
valley forming. You have to end this row in a peak (cluster + 3 chains + cluster).
Since some of you are having doubts about ending and starting a row I have included these
additional instructions and photos to elaborate on them.
In the above picture you can see that I have
made 5 turning chains and made 3 dc (cluster)
into the space between the two clusters in the
previous row.
11. Into the next space make another dc cluster.
12. Into the next space one more cluster.
13. Skip the next space which forms a valley and make a cluster into the next one.
14. A cluster into the next space. Then a cluster, 3 ch, a cluster into the next space where the peak
is formed. Continue the pattern until the end of the row.
told you earlier make pattern such that you end with a peak).
16. For row 3 repeat from step 10 until the end of row. In the picture below you can see that I have
come to the end of row 3.
17. You can see below that I have made a cluster, 3 ch, cluster all into the 5-ch turning space.
Make 5 chains and turn your work and repeat the pattern.
The below picture shows the end of row 4.
And end of row 5.
Now you can see the edges of the pattern evolving. You have to repeat this pattern all along.
As I have told you at the beginning of the tutorial it is always safe to make extra chains at the start
of the pattern so that you can ensure that you have adequate chains to make the required length of
the pattern and that you end with a peak. You can sew in the extra chains. In case you do not want
to have extra chains an anonymous reader has commented that you have to make chains of
multiples of 18+5. You can give it a try.


.jpg)
.jpg)


Comments
Post a Comment